Where Do You Want
to Break Today?
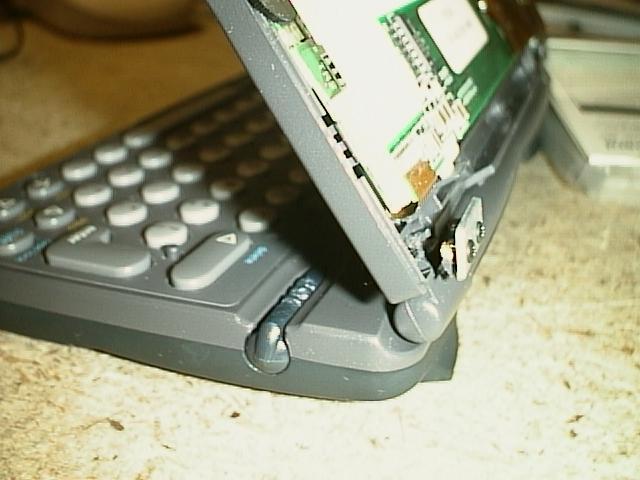
Pictures of where the Velo1 "Floppy
Hinge" syndrome comes from
Owen
(since his warranty is now
expired, he's agreed to put his name up!)
After the extreme floppiness of my fourth replacement Velo1, I became disgusted and wanted to know what in the world is going on with the Velo1 hinge.
The inspected unit has never been dropped, never crushed, always placed in a case, treated better than most children and doesn't even have wear marks on the corners where the coating rubs off. It is above serial number 4000037000 (I won't give out my serial number, I think you know why...)
Opening the unit takes some special tools. Specifically, a small TORX bit screwdriver (T-5), and an x-acto knife or other thin prying instrument to pop the edge of the display unit open without cracking the little tabs that hold it in place. If you've never opened a small electronic device without damaging it (CD, Walkman, HP200LX, HP48G(S)(X)) don't attempt to open it. Just enjoy the pictures.
This picture gives quite a good view of what is going on. The hinge in question is the right hand hinge. This hinge gives all the resistance that holds the display up. It is aluminum and you can get a glimpse of it if you peek into the slit of the hinge between the display and the base.
See how the metal arm has two screws that go into little brass studs that are (supposed to be) secured to the plastic in the front half of the display.
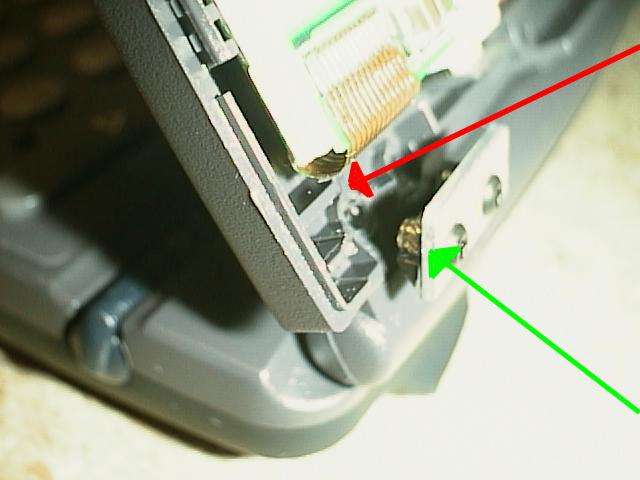
Zooming in, you can now see how the brass studs are anchored into the display. Notice (red arrow) how thin the material is around the studs. The support webs and the cylinders that the studs mount in are only 1.5mm-2mm. This webbing cracks off and eventually the cylinder that the studs are mounted in snap off. Why wasn't this area reinforced with some aluminum plate to distribute the load? Or even a solid plastic rectangle for the studs to mount into? Any way, the point is that the hinge does break at this point and I encourage you not to put any side loads on the display, namely pressing on the side of the display when docking the unit. One note. I was extremely careful this time not to put any side loads on my display, yet it still broke.
The green arrow points to one of the brass studs and the knurling that keeps them secured to the plastic. They do quite a good job of this. Now if only the plastic around it would stay put!
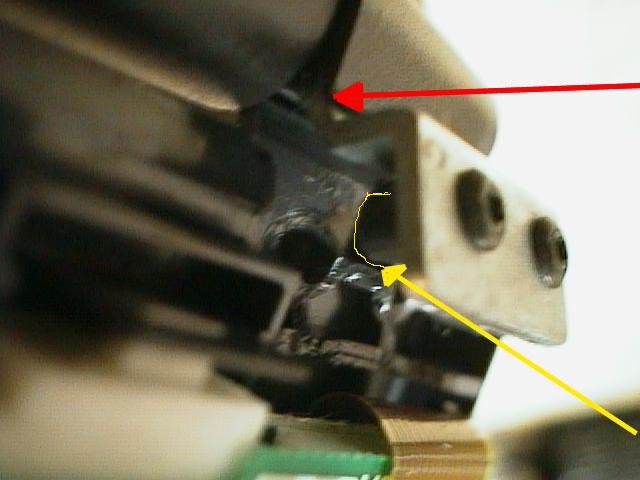
Here is another view of the hinge. Imagine closing the unit and looking from the middle of the back of the display, out towards the right hinge.
The yellow arrow is pointing to the outline of one of the plastic cylinders that has snapped off from the display. Notice that is still firmly attached to one of the brass studs.
The red arrow in this picture is pointing to the point on the metal hinge that my Velo1 #2 broke at (after being in "floppy hinges" mode for a month). This I do not have the faintest how to retrofit this. I can only hope that Velo1 #2 was a fluke and Velo1 #4 will not succumb to that fate.
I have a suspicion that the reason the metal failed was because the hinge was flopping around and closing the unit placed stress in a different location than if the hinge studs were secured firmly to the display.
Now, I'm sure you asking yourself, what the hell do I do about this?
Well, you could always try to get your Velo 1 replaced, but I'm starting to see posts on the newsgroups about how Philips is returning units to customers saying that the 3/4" to 1" of floppiness is "within specifications". I also suspect that the supply of replacement Velo1's is depleting and you might not get a replacement as you approach the one year warranty deadline. Also, my personal experiences with Philips return department has been great on the support side, yet TERRIBLE on the logistics side. Units lost or never received yet I had UPS tracking proof that the box was signed for and received. Delays in shipping. All kinds of lovely logistics problems.
So, here's the fix. Go down to your local hardware or hobby store and get some epoxy or JBWeld. I know it's not the most high-tech solution, but it will at least give additional support to the material surrounding the brass studs. TEST IT FIRST. Put a small drop somewhere inside and test the compatibility of the epoxy with the plastic. It'd really ruin your day if the whole side of your Velo1 melted away.
Drizzle your goop in around where the red arrow is in picture #2. Hopefully, your studs haven't completely torn out, so you can unscrew the hinge and get the whole area around the studs filled in. If it's busted completely, you will have to drizzle in goop and hold the hinge in place with clamps or rubber bands until it dries.
Hopefully this info will help save your Velo1 from an untimely death after your warranty expires.
Good luck and keep on Veloin'!
UPDATE! (3/4/98)
It's been a while since I've emailed to you,but
here's the latest inside info on my dissassembled velo:
I swapped the 4000037xxx Velo1 for a Velo1 in the 4000019xxx range to get an absolutely
FRESH Velo1. (note that he didn't swap it back with Philips
- he had another source)
The other day, the 4000019xxx Velo1(With the 4000037xxx SN!) got pretty loose on the
hinge. I dissassembled the unit and noticed some design changes that have occured from
SN4000019xxx to SN4000037xxx. The three screws on the front of the display (under the
sticker) are philips instead of TORX. Also, the two hinge screws are philips instead
of TORX. Also, the metal part of the hinge seemed less beefy, but this just might be my
imagination.
However, here's the GOOD news. This time, the source of the floppy hinge was from the two
hinge screws working loose. All I had to do was the JBWeld retrofit while I was in there,
and put some Loc-tite on the screws.
The Velo page looks GREAT!